How to Wrap Correctly for BFR Training

What to Use
Blood flow restriction training was originally performed using an inflatable cuff, known as a KAATSU band, that was linked to an electronic monitor. Unfortunately, KAATSU devices are expensive, complicated to use and not easily transportable.
It is possible to use knee wraps or a similar elastic bandage; however, it is difficult to achieve a correct and even pressure when using these solutions since they are often too long to handle (2+ meters).
Instead, we recommend using a purpose designed strap or band for BFR training. That way, you are able to more accurately control the pressure and easily replicate it in future workouts.
Moreover, you avoid having to deal with the unnecessary slack dangling around your arms or legs when doing your exercises which is often the case when using knee wraps.
Advocates for using Kaatsu equipment argue that you will never be able to find as accurate a pressure when using practical BFR training bands compared to Kaatsu equipment.
Even though that might be true, we believe it comes down to a matter of practicality and affordability. Just always remember to follow the appropriate guidelines and rather apply a lower pressure compared to a higher pressure, if you are in doubt.
Where to Wrap
The researchers within the field of BFR training now broadly agree that the correct placement for the band or strap is proximal to the torso meaning as close to the heart as possible.
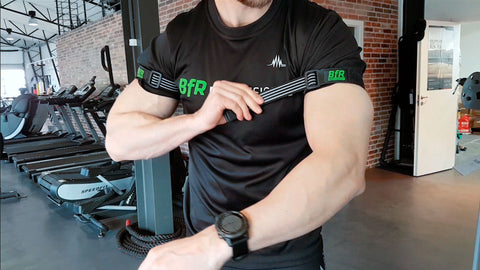
For the upper body, place the strap just below your armpit, between your shoulder and bicep/triceps muscles. For the lower body, place the strap at the top of your thigh just below your glutes.
Note: if you are using knee wraps rather than a BfR Pro LEGS, make sure that when you wrap you do not end up wrapping the entire thigh – as this increases the risk of completely occluding the arteries. Wrap the band whilst trying to keep the pressure as even as possible as you add each layer.
How Tight to Wrap
For both your upper and lower body, it is suggested that you wrap to 4-7 out of 10 in tightness; with 10 being as tight as possible. You shouldn’t feel any numbness or tingling once you’ve applied the strap.
If you are not feeling and numbness or tingling but are still unsure whether you’ve wrapped too tight, you can easily check by doing a capillary refill test. Once you’ve applied your strap, press down on the palm of your hand with one finger until your skin turns white. If you have your straps applied correctly, you should see normal colour return in no more than 2 seconds.
When you are first starting with blood flow restriction training and not 100% sure on your pressures, it’s safer to be a little loose than too tight. Researchers wrapped subjects at either 40 or 80% tightness and measured the effect on muscle growth & strength.
Interesting, both pressures produced the same amount of gains. So wrapping a little lighter will still give you the gains you’re after without running the risk of complete arterial occlusion.
Any questions hit us up on Facebook here or even better @bfrpro on Instagram.
Team BfR Professional

1 Response

Richard Everstine
When checking the pressure on the pump, is it best to keep one’s arms straight, or can they be bent?
Leave a comment
Comments will be approved before showing up.
Related Posts

New Partnership: Find BfR Exercises In New Fitness App
Building Muscle on the Move


Lars Thorn
Author